%201.png)


Learning Objectives:
- Learn how speaking observations aloud enhance efficiency and patient engagement.
- Use the Context tab to include details outside of the consultation and sync these changes across your documents.
- Use the Replace feature to temporarily or permanently change the output of a word or phrase
- Learn how to generate multiple documents in a session using the "Create" tab.
1. Speak aloud to enhance efficiency and patient engagement
- Gain consent out loud
- Verbalising observations: Speak your observations aloud during the consultation so Heidi can transcribe in real-time.
- Heidi captures these spoken notes, saving time on post-consult documentation.
- Flexibility to pause: If preferred, stop transcription, select your Heidi template, and generate the initial note. After the patient leaves, click resume, speak any additional findings aloud, and Heidi will update the note with your extra observations.
- If you prefer, you can type additional observations and findings instead into the 'Context' section after the patient leaves.
- Improved patient outcomes: Speaking out loud enhances patient involvement and overall satisfaction
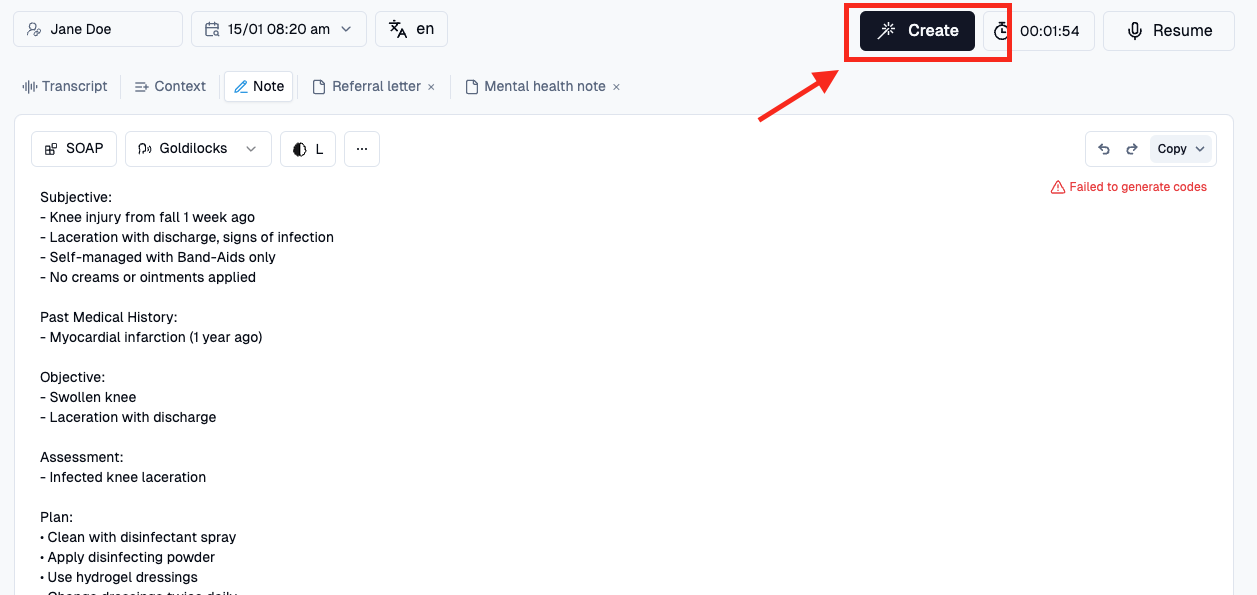
2. Creating more than one document
If you need to create additional documents beyond your primary note, use the "Create" button and choose your desired template.
E.g. you can create a referral letter or a follow-up note.
3. What's the Context Tab?
Next to your Note tab is Context. This feature allows you to include any relevant information before, during, or after your session. It has several use cases, such as:
- Adding information from another consultation.
- Recording details that you don't want to say verbally during the consultation but still need in your notes.
- Creating a note from uploaded files
How do you incorporate Context across notes?
Information in the context tab won't automatically sync across your notes. Instead you can choose to sync them, by pressing into the specific note and pressing "Sync changes" button on the top right
💡 Tip: To capture the context properly in your notes when syncing, include clear instructions in your template e.g.
“(Include all information from the Context Tab.)”
We’ll cover more about template content in the next module.
How do you create a note from uploaded files?
- At the bottom of Context tab, upload your document (PDF, DOCX)
- Click "Create note from context"
- Choose your preferred template, and your note will automatically populate with information from your file.
Note: You can only use this feature before a session has started. Once the session has been transcribed, this option will no longer be available. However, you can still manually edit the Context box and sync changes.
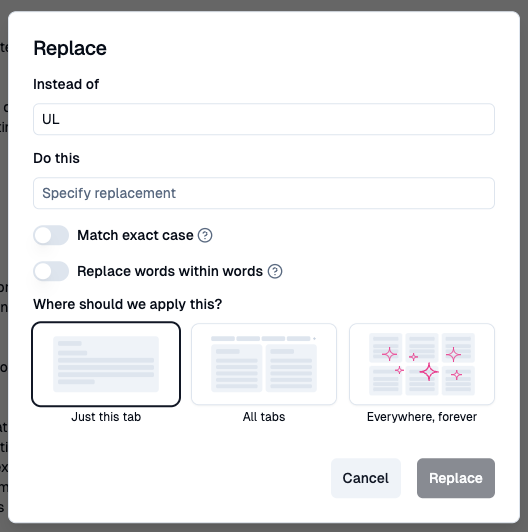
3. What's the Replace Feature?
To permanently or temporarily change how Heidi output of a word, use the Replace feature found via
- Settings > Memory > Replace
- Directly highlight the word in your note and choose Replace and Find
The second option allows you customise this feature adjust the cadence of this change:- Match exact case > Case sensitive and applies change to exactly how word is written
- Replace words within words> Apply change within words
- Cadence of change:
- Just this tab
- All tabs
- Everywhere, forever > applies to all sessions
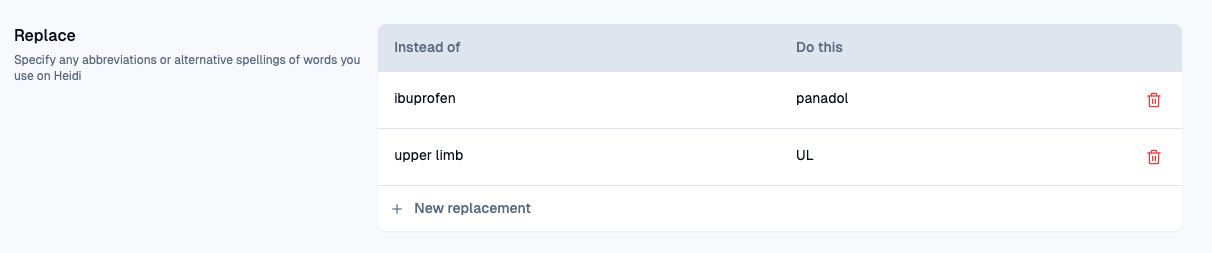
Replace feature is useful for:
- Directly changing how a word is spelt
- Abbreviatingwords
- Fixing spelling mistakes

.webp)